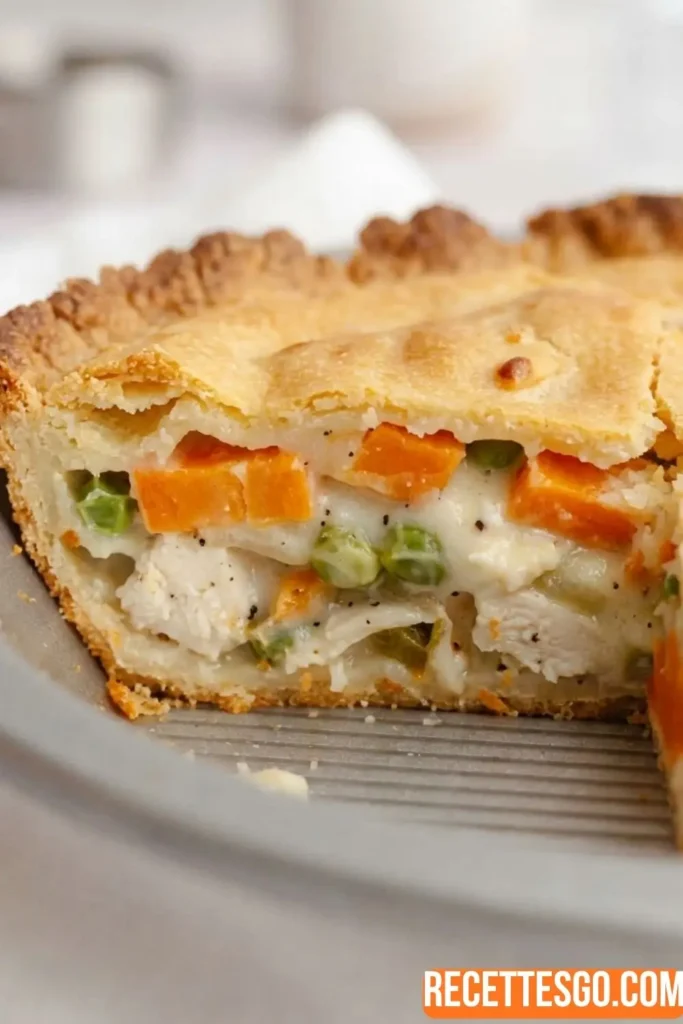
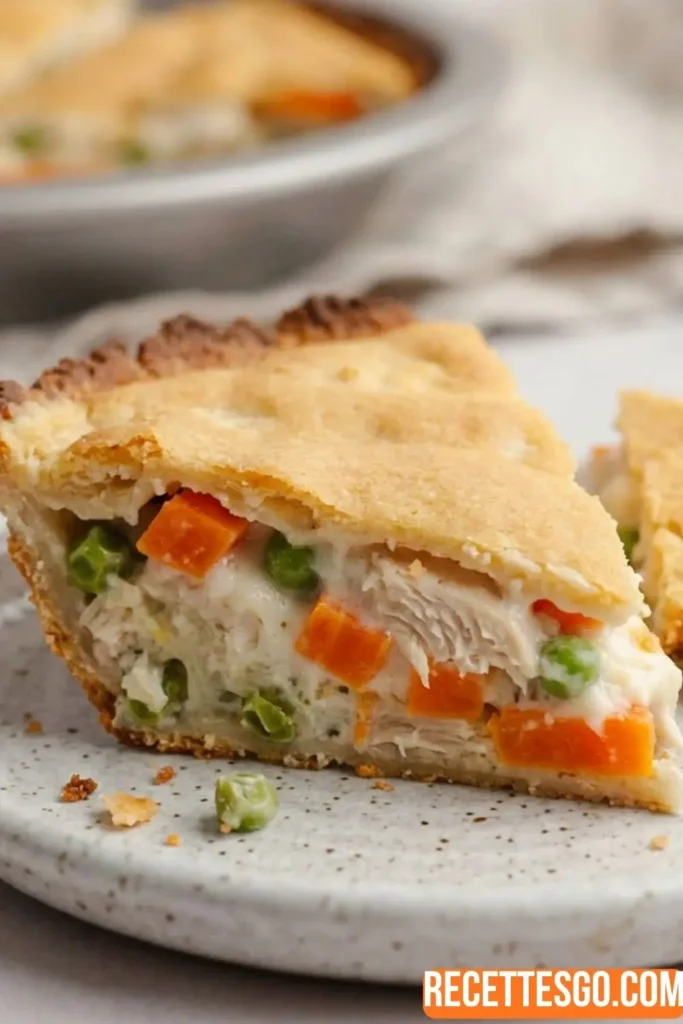
there are some recipes that just feel like a hug from the inside. You know the ones. The kind that make the whole house smell incredible, and by the time it comes out of the oven, everyone has somehow migrated to the kitchen without being called. This Bisquick chicken pot pie recipe is exactly that kind of dish. No fuss, no complicated techniques, no pie crust disasters. Just pure, golden, creamy comfort in every single bite.
I first made this on a cold Tuesday evening when I absolutely did not have the energy to do anything ambitious. I had leftover rotisserie chicken, a bag of frozen veggies, and — crucially — a box of Bisquick sitting in the back of the pantry. One Google search later, and I was hooked. Honestly? I’ve made it at least a dozen times since. It’s become one of those back-pocket recipes I pull out whenever life needs a little warming up.
“A chicken pot pie with Bisquick is proof that the best meals don’t require a culinary degree — just good ingredients and a little love.”
Why You’ll Love This Chicken Pot Pie with Bisquick
Let’s be honest — traditional pot pie from scratch is delicious, but it can also be kind of a project. Rolling out homemade pastry, chilling the dough, blind baking the crust… it’s a whole thing. That’s exactly why chicken pot pie and Bisquick is such a genius combination. You get that same cozy, hearty, stick-to-your-ribs pot pie experience, but without the stress. The Bisquick does the heavy lifting so you don’t have to.
Here’s what makes this version especially lovable:
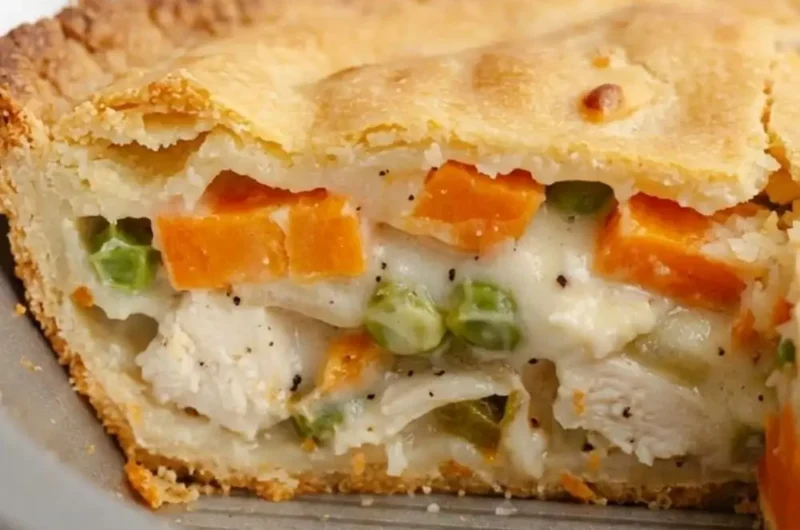
- Three-layer magic: A bottom crust, a thick and creamy filling, and a pourable top crust. It’s layered perfection.
- Ready in under an hour: From pulling out your pan to setting it on the table, we’re talking 45 minutes, give or take.
- Total crowd-pleaser: Kids love it, adults go back for seconds, and picky eaters somehow always clean their plates. I have yet to meet someone who said “eh, it was okay.”
- Infinitely flexible: Got turkey instead of chicken? Great. Different veggies? Works perfectly. Dairy-free household? We’ve got you covered below.
What Is Bisquick, Anyway?
Quick sidebar for anyone who’s never baked with Bisquick before — don’t let the pancake picture on the box throw you off. Yes, it’s a baking mix most famous for fluffy weekend flapjacks, but this stuff is genuinely versatile. Think of it as a pre-mixed blend of flour, leavening, fat, and a touch of salt. It’s the shortcut ingredient that makes chicken pot pie with Bisquick so brilliantly approachable.
In this recipe, Bisquick shows up in all three components — the bottom crust, the filling (as a thickener!), and the poured top crust. It’s the unsung hero of the whole dish. If you can’t find it locally, there are easy copycat homemade versions online that work just as well.
💡 Pro Tip
Don’t skip the 5-minute pre-bake on the bottom crust. It creates a slightly firmer base that holds up beautifully under all that creamy filling and won’t go soggy on you.
Ingredients Breakdown & Smart Swaps
Before we get into the step-by-step, let’s quickly talk through the key ingredients — because knowing your options makes cooking a lot more fun and a lot less stressful.
The Chicken
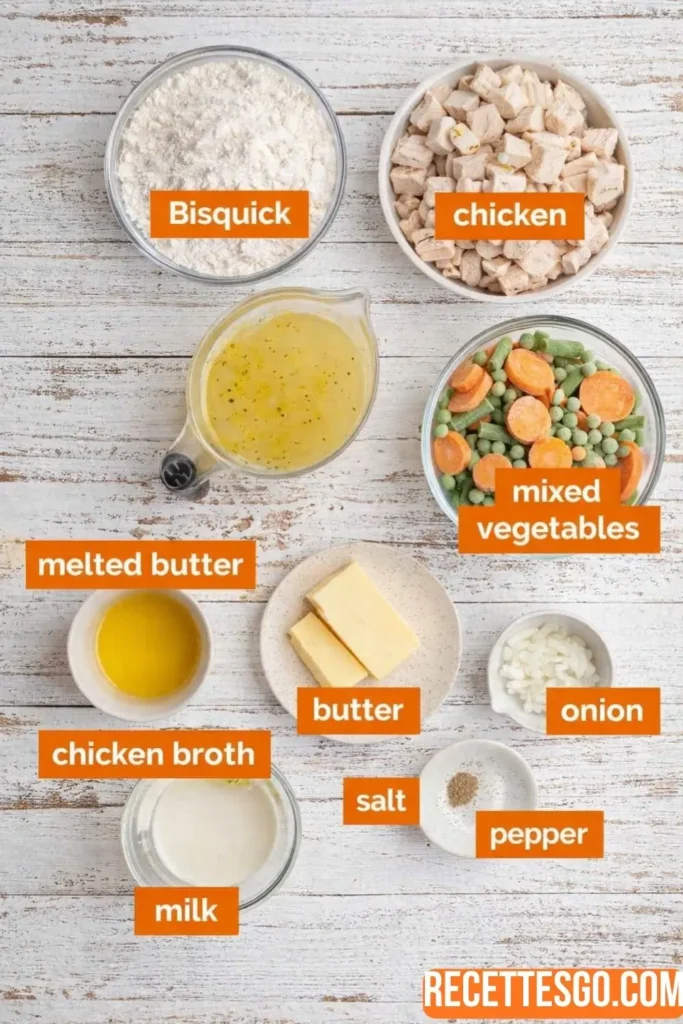
This chicken pot pie recipe with Bisquick calls for 1½ cups of cooked, cubed chicken. Honestly, this is where rotisserie chicken is your absolute best friend. Grab one from the grocery store on your way home, shred or cube it, and you’re ready to go. Pre-cooked packaged chicken works too, and so does canned chicken in a pinch. Leftover Thanksgiving turkey? Yes, absolutely. Turkey pot pie with Bisquick is just as wonderful.
The Vegetables
The recipe uses frozen mixed vegetables — carrots, peas, and green beans — which are perfect because they’re already chopped and just need to be stirred in. That said, feel free to swap in whatever you love. Corn, broccoli, celery, or even diced potatoes all work beautifully. Just note: if you’re using canned vegetables, add them in with the chicken at the end instead of cooking them in the sauce. Canned veggies are already soft and will turn to mush if they cook too long.
Making It Dairy-Free
Good news for anyone cooking dairy-free — this recipe adapts really well. Swap the whole milk for oat milk or cashew milk (both have a neutral flavor that won’t change the taste), and replace the butter with Earth Balance baking sticks. Just skip the added salt in the filling when using Earth Balance and taste as you go.
How to Make Bisquick Chicken Pot Pie — Step by Step
Alright, let’s get into it. This is genuinely one of the more straightforward recipes you’ll make, but I’ll walk you through each step so nothing catches you off guard.
Step 1 — Build Your Bottom Crust
Start by preheating your oven to 400°F. While it heats up, cut cold salted butter into your Bisquick using a pastry blender until the mixture looks like coarse, sandy crumbs. Stir in the milk until a shaggy dough forms, then press it into the bottom and up the sides of a 9-inch pie plate. Pop it in the oven for just 5 minutes until it barely starts to turn golden. Pull it out and set it aside — it’ll finish cooking later with everything inside.
Step 2 — Make That Creamy Filling
This is my favorite part. Melt butter in a saucepan over medium heat, then stir in Bisquick, chopped onion, salt, and pepper. Keep stirring until the mixture gets bubbly — that means the flour in the Bisquick is cooking and the sauce is going to be thick and velvety rather than pasty. Take it off the heat, gradually pour in your chicken broth, then add the frozen vegetables.
Return it to medium heat and stir constantly until it reaches a full boil. Let it boil for one whole minute — this activates the thickening fully so your filling sets up properly once baked. Pull it off the heat, stir in your cooked chicken, and pour the whole glorious mixture into your pre-baked crust.
Step 3 — Pour On the Top Crust
The top crust of this bisquick chicken pot pie recipe is honestly one of its most magical features. Instead of rolling out dough (which, let’s be honest, nobody wants to do on a Tuesday), you simply whisk together Bisquick, milk, and melted butter until smooth, then pour it right over the filling. Use a spatula to spread it gently to the edges. That’s it. Into the oven it goes.
Step 4 — Bake and (Patiently) Wait
Bake for 25 minutes until the top is beautifully golden and just a little puffed. Then — and this is important — let it stand for 10 minutes before you serve it. I know. The smell is incredible and waiting feels impossible. But those 10 minutes let the filling firm up enough to actually hold its shape when you scoop it out. Worth every second.
Storage, Leftovers & Freezing Tips
One of the best things about this chicken pot pie and Bisquick recipe is that it stores really well. Leftovers keep in the refrigerator for up to 4 days — just cover the pie plate tightly or transfer to an airtight container. Reheat individual portions in the microwave, or warm the whole thing in a 350°F oven until heated through.
For freezing, bake the pie completely and let it cool all the way down to room temperature. Wrap it tightly in plastic wrap, then a layer of aluminum foil, and freeze for up to 3 months. To reheat from frozen, remove the plastic wrap, keep the foil on, and warm it in a 350°F oven until it’s heated all the way through. It reheats surprisingly well — the crust stays crisp and the filling stays creamy.
🥗 What to Serve With It
Honestly? This pot pie is a complete meal on its own — protein, vegetables, and carbs all in one dish. But if you want to round things out, a simple tossed green salad is a perfect, light counterpoint to all that richness. A glass of something cold doesn’t hurt either.
Frequently Asked Questions
Can I use canned chicken in this recipe?
Absolutely! Canned chicken works well here — just drain it thoroughly before stirring it into the filling. It’s one of the quickest shortcuts if you’re in a real time crunch.
My Bisquick box only shows pancakes — is it the right product?
Yes! That’s the right box. Bisquick is an all-purpose baking mix that goes way beyond pancakes. The pancake imagery is just the most recognizable use — don’t let it fool you. It’s the exact right ingredient for this chicken pot pie recipe with Bisquick.
Can I make this ahead of time?
You can prepare the filling in advance and refrigerate it for up to a day. When you’re ready to bake, pre-bake the bottom crust, add the filling, top it, and bake as directed. Just note that the filling may need an extra few minutes in the oven if it goes in cold from the fridge.
Can I make a larger batch?
Yes — just double the recipe and use a 9×13 inch baking dish instead of a pie plate. The bake time may increase by 5–10 minutes, so keep an eye on the top crust and pull it when it’s golden brown.
Final Thoughts — Make This Tonight
Look, I’m not here to oversell recipes. But this one? This Bisquick chicken pot pie genuinely delivers every single time. It’s the kind of dinner that turns a regular Wednesday into something worth sitting down for. It comes together fast, uses ingredients you likely already have, and tastes like you spent way more time on it than you actually did.
Whether you’re cooking for a hungry family, meal-prepping for the week, or just craving something warm and homemade on a cold evening — this chicken pot pie with Bisquick has got you. Make it once and I promise it’ll go straight into your regular rotation. Just like it did for me.
Happy baking — and don’t forget the 10-minute rest. Future you will be so glad you waited.
Bisquick Chicken Pot Pie Recipe
6
servings20
minutes30
minutes360
kcalA hearty, from-scratch-tasting pot pie made easy with Bisquick — flaky double crust, creamy vegetable-chicken filling, and golden top in under an hour.
Ingredients
- Bottom crust
1 cup (120 g) Bisquick
2 tbsp salted butter
2 tbsp whole milk
- Filling
¼ cup (56.75 g) unsalted butter
¼ cup (56.75 g) unsalted butter
2 tbsp chopped yellow onion
¼ tsp salt
Pinch ground black pepper
1 cup (182 g) frozen mixed vegetables (carrots, peas & green beans)
1¼ cups (293.75 ml) chicken broth
1½ cups (210 g) cooked cubed chicken
- Top crust
½ cup (60 g) Bisquick
⅓ cup (81.33 ml) whole milk
1 tbsp salted butter, melted
Directions
- Preheat
Heat oven to 400 °F. - Make the bottom crust
In a medium bowl, use a pastry blender to cut the butter into the Bisquick until the mixture resembles coarse crumbs. Stir in the milk with a wooden spoon until a dough ball begins to form. Press the dough evenly onto the bottom and up the sides of a 9-inch pie plate. Bake for 5 minutes, or until just lightly golden. Remove from the oven and set aside. - Build the filling
Melt the unsalted butter in a 2-quart saucepan over medium heat. Stir in the Bisquick, chopped onion, salt, and pepper. Cook, stirring constantly, until the mixture turns bubbly. Remove from heat. Gradually stir in the chicken broth, then add the frozen vegetables. - Thicken and add chicken
Return the pan to medium heat, stirring constantly until the mixture reaches a full boil. Continue stirring for 1 minute more. Take off the heat, stir in the cubed chicken, then pour the filling into the pre-baked crust. - Add the top crust
Whisk the Bisquick, milk, and melted butter together in a small bowl until smooth. Pour evenly over the filling, then use a rubber or offset spatula to spread it gently to the edges of the pie plate. - Bake and rest
Bake for 25 minutes, or until the top crust is deep golden brown. Allow the pie to stand for 10 minutes before slicing and serving.
Notes
- Chicken: Rotisserie chicken works beautifully here — just cube it up. Pre-cooked packaged chicken or canned chicken are both fine shortcuts. Turkey is a great swap as well.
- Vegetables: Feel free to swap in your preferred frozen mix. If using canned vegetables, stir them in alongside the chicken at the end — cooking them earlier will make them too soft.
- Dairy-free: Replace whole milk with oat or cashew milk (neutral flavor, similar texture). Swap butter for Earth Balance baking sticks, and omit the salt in the filling — taste and adjust before pouring into the crust.
- About Bisquick: The box will likely show pancakes on the front — that’s normal. It’s a versatile all-purpose baking mix used in far more than just pancakes, and it’s exactly what this recipe calls for.
- Serving suggestion: This dish is a complete meal on its own. A simple tossed green salad on the side is all it needs if you’d like to round out the plate.